In this article you'll find some nice explanation on properties of the number e.
More visual art creator, in Amiga and Comodore 64 style!
Now, a little about self-hosting: this site features a weekly newsletter about the subject.
On hardware this cafe has some great cyberdecks which I don't get tired of watching.
To finish this a design and code studio that has some incredible ascii art.
See yall.
dev log: New git hooks
Published: 2025-04-05
Just want to give a quick update on my infra setup. After
getting tired of doing scp to update my site and
blog, I decided to use a git hook for that.
The result is a super simple git hook that updates the
files changed on the commit, and for the files in
www folder copy them to the git page. I know
this is kinda the other way, normally those files go to
the server, but in my setup they live among the git
files:
So using the www for those files makes it more
clear that they are special ones. That let's me run my
server and git under the same root, this the same URL.
This is the hook, use it as you please:
#!/bin/sh

OUT="$HOME/terminal.pink"
OPTS="--no-commit-id --no-renames --name-status --root -r"

update() {
        echo "updating files with $1"
        while read -r op f
        do
                echo "$op $f"

                echo "$f" | grep -q "/" && \\
			mkdir -p "$OUT/${f%/*}" > /dev/null

                # the rest is copied to my blog
                case "$op" in
		"D") rm -rf "$OUT/$f" ;;
		"A"|"C"|"M")
		git cat-file -p "$1:$f" > "$OUT/$f" ;;
                esac
        done <<- EOF
        $(git diff-tree $OPTS "$1")
        EOF
}

echo "starting post-receive"
while read oldrev newrev ref
do
        case "$ref" in
        "refs/heads/main") update "$newrev" ;;
        esac
done
echo "done"
The hook for this blog is just slightly different.
Internet Highlights XI
Published: 2025-01-29
This time I'd like to dedicate this wrapup to the humans, which
are terrible animals, and are doing very bad things.
Cyberia club is a kind and amazing hacker collective centered in Minnesota.
Marginalia is an independent open source Internet search engine, with great content!
Let me know what you think! Bye.
100 days of uptime
Published: 2024-12-24
I'm super happy to see that this very website, along with
others: terminal.pink,
dovel.email,
derelict.garden and
suavemente.org; which are
all hosted on my Raspberry Pi Zero W, at my living room, have
reached 100 days of uptime!
This may not be important to you but the theory behind
it may be interesting, but for now I will leave you at
that because I'm in a hurry.
And counting.
Hosting your git repositories - part 2
Published: 2024-12-23
This article will discuss giving public read access to your git
repositories, for setting up private write permission see
part 1.
Using the git dumb protocol
This is the easiest way in my opinion to let your git repo be
cloned or pulled. The advantage of this protocol is that your
repo can be fetched using HTTP, the git program
knows how to clone a repo using HTTP and will use it
automatically if needed.
This means you can serve your repository using any
HTTP server, i.e. apache, caddy, tomcat etc, since
your git files are just static files. There are
drawbacks of course, this protocol is slow and old and
has been replaced by the smart protocol, which
unfortunatelly doesn't work with normal HTTP servers.
To start using this technique, configure your HTTP
server to serve static files from a folder, say
repos. Inside that folder you can create your
bare repositories, i.e. proj1 with:
cd repos && git init --bare proj1
This will create a new (empty) repository. You can
also make a bare clone of an existing repository using:
cd repos && git clone --bare [your repo url]
However, you will notice that these repos cannot be
accessed by HTTP, that's because the repo is lacking
some auxiliary files needed.
update-server-info
This command is used to generate or update the necessary files
for a dumb server be able to serve the repo properly, you must
manually run this at the time you create your bare repos:
cd proj1 && git update-server-info
Now you should be able to clone or pull from this repo. Now, to
run this automatically every time you push to your repo you can
use the git hook strategy, so you always serve updated content.
Using git hooks
Git hooks are your friend and they have even more use for dumb
servers, to run update-server-info for every push
I chose the hook post-update, which runs after the new
commits are added, the sample that comes is good enought for
my distro. If not just add the command there and rename the
hook without the .sample suffix.
This is the way I configured my project lin0. But there
are still improvements for this setup. To be able to
serve the files from the repo I also added:
git --work-tree=tree checkout -f main which
is the
index
page you see. In the future I will move this to remove
the tree path.
Other options
This short article showed the dumb server approach, but there
are many others, some I'll probably publish in follow ups. Some
options are:
There are much more, but these are some good starting points.
Each has its own pros and cons, in the next article we will
discuss some of them, for me what is working better is this
dumb protocol and git hooks combination, but this is a matter
of personal taste and requirements. Thanks.
As many of you already know this site is also available on the
Gemini Web, not Google's Gemini. This is somewhat new and I stil
need to do some ajustments, as converting from HTML to gmi markdown
is not perfect. In fact many things in my setup are not perfect.
First, my gemini server can only have one domain per machine,
so that means only my blog is available now. My current
workflow is to create the HTML content and then use
html2gmi to
create the corresponding .gmi file, regenerate the feed and
then upload everything to my raspberry pi using scp. The issue
here is the conversion, as posts are written with HTML in mind,
the html2gmi tool has its own style that doesn't fit mine well.
Lastly, my rss feed generator can't extract info from gmi files
and thus only the link is shown.
Next steps are tweaking my publications, the rss generator and
the conversion tool to create better .gmi files, ideally this
should change links to .html files to the respective .gmi file,
and add metadata to posts somehow, since there is no metadata
support in the gemini markup spec.
I plan to improve support for gemini web on this site and
on the tools that I use, I hope this will incentivise folks
to use this new and incredible publication platform. If you
want to keep track of this developments here are some links:
I'm pleased to publicly share that Lin0 has reached v0.0.1 and
can be downloaded or built for end users.
Lin0 (Linux zero) is a super minimal source-based
linux meta-distribution, primarily aimed at power
users or minimalism enthusiasts. It was born from
exercises in how minimal a linux system can get.
At this time we provide 3 optimized images: Pinebook Pro,
RPi3B+ and HP Elite Desk G1 800, as well as generic amd64
and arm64 images. In any case you can clone the repo and build
for your architecture.
Lin0 leverages a small system built from scratch using
a selected list of software, which includes:
The logo is a willow tree, which reminds me of
the wise tree in the Pocahontas movie, it is also
a small homage for my son William.
Obtaining
Please refer to the project site for
the download links, there are tarballs, a docker image and
instructions to build your root filesystem.
Roadmap
The big plan is having a complete project with many supported
targets, I plan to provide images for more platforms but that's
the hard part, since I do not have the hardware right now.
Other things planned are:
A package manager
An X11 replacement
XDG desktop implementation
System management software
Contributions can be made by email using the common
git email workflow. More info on the project's page.
The mailing list is also very open to discussions and
side topics, you are very welcome.
Thanks!
So far I only published it here and on TabNews,
and I think it had a good reception. Finally, I'd like to
emphasize my commitment to creating open and quality software
that can make a change to a better software ecosystem, and Lin0
is my current endeavor for it. Let's build together a great
community for Lin0!
My astro project was renamed to ereandel due to packaging
needs, as there is another project named astro.
Earendel is the most distant star not belonging to a
cluster, also, Eärendil (a close pronunciation) is a
character in the J.R.R. Tolkien's universe. Thus the
perfect name for this project (with a twist).
Thanks to this, Akash Doppalapudi packaged it to the
Debian project! Which is great news. Having a project
published on the Debian repositories is a milestone, I
hope this brings new opportunities for the project.
Kudos to Akash for packaging ereandel and for having
the patience that the Debian packaging guidelines
require.
Our site accesses
Published: 2024-08-19
Just out of curiosity, this is a plot of connections to the
domains hosted here:
Some considerations: the numbers represent succesfull
connections to my server, that is a TLS handshake.
A magazine that features industrial design articles, portfolios, jobs and more
astro: 50 stars!
Published: 2024-04-22
Just wanted to share that a project of mine,
astro, has reached 50
stars! That's my project with most stars at this moment, I'd
like to thank all contributors, stargazers and people that
helped the project reach this cool milestone.
I'd like to reiterate that the astro project is under
development, and well maintained by me and open source
contributors. Looking ahead I plan to add more features
such as:
Better bookmark management
Implement the rest of the gemini protocol
Support downloading capsules
Add client certificates management
And of course, listen to users' feedback and implement
desired features. So if you want a feature feel free to
open an issue and comment.
Thank you!
dev log: building my own distro
Published: 2024-02-26
Another adventure have started: I'm builing my own distro! I'm
not sure about the motivations as it started naturally from my
fidlings with OSs. Some of the things I remember are:
My disk was full, so I began to think how to use less space
I want to try musl
I discovered that the linux kernel can run shell scripts as init
I like minimal stuff
Turns out there is a cool project called
buildroot that makes building a minimal linux system
very easy. So I used it to create the linux kernel and userspace
programs for a RPi 3B+ I had lying arround.
The result was a system that does the minimum: boots the linux kernel
without initrd directly from the RPi bootloader, it then runs a
simple shell script as init and drops to a shell.
This system is taking only 22MiB of RAM, which 14 are
cache, and 500MiB of disk, which 470MiB are for git
binaries. I am very happy. Obviously there are
drawbacks: no module hotplugging, this gave me a
headache as my keyboard needed a kernel module, it
took me a day to figure this out. I tought this was
the kernel's job.
So far I'm having a great time learning, turns out
there is a lot of details we usually don't need to
know. For example, firmware, which for the RPi is a
must: in order to load the brcmfmac module
its firmware must be present in the correct place. If
not whenever you modprobe it you'll get a
subtle timeout error.
Luckly buildroot also facilitates this, just select
the corresponding option in firmware section. The
next steps are now building
sbase,
ubase and
sdhcp. I also
included a tiny c compiler
so I can compile the rest of the system.
So far this is the init script:
#!/bin/dash

echo "Init started"

export PATH=/usr/bin:/bin:/sbin:/usr/sbin

mount -n -o remount,rw /
mount -t devfs /dev /dev
mount -t proc /proc /proc
mount -t sysfs /sysfs /sys
mount -t tmpfs /tmpfs /run

modprobe hid-apple
modprobe brcmfmac
agetty -n --login-program /bin/dash tty1

shutdown -h
There is too much to do, still. I'll keep you posted.
jumentosec
Published: 2024-01-21
A friend of mine is launching, according to his words:
The #1 Underground & Vendor Neutral Security Conference in Brazil,
which will host a conference this year!
Bytes is a new series os posts that are starting today.
sometimes I notice or think funny things, so I decided
to publish them. Here it is for today:
I was watching Monk and there is one scene that
a boy coughts near Monk. The funny part is that
this boy only shows up in that scene, so I
wanted to watch the episode's credits just to
see that.
This is the scene the coughing boy shines on
his participation:
and the credits screen:
another great episode.
So I bought the pinebook pro
Published: 2023-10-19
It is usable 97% of the time, this 3% is related to a
weird bug with the keyboard, the touchpad and screen
sharing, video calls; but I'll explain. My current
setup is Arch linux with DWM.
Here are some points:
Body
The pinebook pro laptop is lightweight, sleek, compact and pretty; it has
a premium feel given by the magnesium shell and a gorgeous display. microSD
slot is also very good to find.
Battery
It has a decent battery, frequently i can use it all day long without
a recharge. i'd only remove the barrel port, as the USBC port can be
used for charging, so no real need for it.
Touchpad
The touchpad feels a little weird sometimes, it is a little fuzzy and
I have difficulties using the right click, I don't get it every time.
The website says it's a large one, but I don't think so. I'd have it a
little larger and make the click feel the same place everywhere, it clicks
only on the bottom.
Keyboard
Very good one, not the best, the only thing that bothers me is that sometimes
I get a doubled key, may be a firmwware thing.
Camera
People could see me clearly, sometimes it gets really dark I don't know why,
may be some misconfiguration on me. The real issue is processing power, when
I turn it on the laptop becomes unusable, totally lagged.
CPU/GPU
I think this is the only thing that bothers me everyday, it is slow and there
is no hardware acceleration for the graphics driver at this time of writting.
I use very light software and it sometimes lags. But software support for most
applications is fine, only missing OSS.
misc.
This is very personal: the only design detail that is not what I like is
the display being a little bigger than the bottom part, so when it is closed
the lid is not aligned, but that's really a manner of taste. The pine website
doesn't deliver to brazil and that's a huge bummer, specially because they do
not answer any email or support ticket, horrible customer service.
In sum it is a great linux laptop specially if you consider that it is only 219.99$, I hope Pine64
continue to improve it, they are doing a great job for the linux/BSD ARM community.
Please if you know how to solve any issue I found please reply this post. Thanks!
Internet Highlights V
Published: 2023-10-13
this time i'll add descriptions, per my last feedback.
In this post I will talk a little about my workflow for publishing
content. I find it quite simple and therefore decided to share it with
you.
The first part is to know the infrastructure that I built for my
server. My blog and homepage resides on my Raspberry Pi Zero W which
is connected to my router with a small USB cable to receive power. And
the router is connected to a UPS. This part was done this way because I
wanted to venture into the world of hosting. And I liked the results,
but it is much easier to pay for a VM in any cloud.
Router configuration
This part is not difficult, the goal is to route traffic to my server, for that
I entered the Arris configuration and created a virtual host, I put a static IP
for the RPi and added a port forwarder from port 443 to 4433. This way I can
upload a service without needing root privileges.
Some optional things that I decided to have, and with great difficulty,
were:
Business internet plan: to have ports 25, 80 and 443
unlocked. The block is illegal in Brazil, but anyway.
Without this unlock, the only way is to use VPN.
Static IP: together with the business plan it was the
most difficult, at least 3 months talking to the
operators, horrible service, unprepared staff.
Undoubtedly, this was the saddest part of the setup. However, these
optionals facilitate me in the code, since I don't need to configure
DDNS. And this prevents interruption of access as my DNS always points
to the correct IP.
The server
Now we come to the actual programming. The server is written in C and listens
to an unpriviledged port, so I run it as a normal user, which gives me more
security and simplifies the process a lot, since my user has all the permissions
for the publishing flow. The server's code can be found on GitHub:
servrian.
In the server, I decided to use static pages, so servrian only works
for that case. For the articles, I just write them in HTML.
Adding content
Now that all the configuration and development work is done, creating and
deploying content is simple:
Write the content
Update index page
Update feed and sitemap
Run scp
Conclusion
It wasn't an easy process overall, and my impression is that we are
technologically behind, as the worst part was the internet plan. If
there weren't so many complications with blocked ports and network
configuration by the operators, the project would have ended in a weekend
(at least the functional part). Of course, styling and content development
can take an indefinite amount of time. As I wanted to integrate with email
the project became a little more complex.
The code part is not complicated and can be even easier when using
ready-made projects or pre-configured Docker images. Here I wanted to
do everything from scratch for two reasons: 1. to learn how the many
parts work internally, and 2. to create a lighter version than current
projects.
It's this second point that I'm most proud of, everything is very light
and efficient: the blog's homepage has 2700 bytes and loads in 80ms,
it's valid and simple HTML, my portfolio, the page above the blog, has
575 bytes; this allows the project to be served from my Raspberry Pi
Zero W, which only needs 5V to operate. In addition, it still loads
other projects like my Git and email server.
These are the difficulties you may encounter if you decide to venture
down this path, at least here in Brazil. I hope I've helped in some
way. I say it's worth it if you value extreme simplicity, like to do
things your way, and want to get away from the dependence of the
infamous big techs, libraries or frameworks, and above all,
learn a lot.
Future plans
I still want to change some things in the project, out of pure curiosity and
zeal:
Use a solar panel and battery to save energy.
Hosting your git repositories
Published: 2023-02-21
Setting up a git server is easy, and involves only common shell
commands, this post will show you how I started my very first
self-hosted git server. find one extra computer and set up a
SSH connection to it, then you are ready to start. here I used
my raspiberry pi, which is always up [1].
To setup the git server you should do the following on the
server machine:
Create git user
Add sshd keys
Create projects dir
Create empty git repo
Using the git shell
Create git user
This step is just sudo useradd -m git, no secret here.
now log in this user.
Add SSHD keys
This part is the creation of the authorized_keys, so you can
SSH in with this user. Basically you just add the allowed
public keys here. In my case I just copied from my main user,
but the ideal case is creating another key and adding that to
the git server.
Now you should be able for SSH into your git machine using the
key you added.
Create projects dir
This step is optional but I like creating a dedicated folder
for my projects, so I ran: mkdir git, and entered it.
Another cool thing to do is to change the default git branch:
git config --global init.defaultBranch main
Create empty git repo
This is the command that creates a repo on the server, so you
can push to this repo. To create it first create a folder, and
then issue the init command:
mkdir project
cd project
git init --bare
At this stage you have a fully functional git repository, to
use it you proceed as you do for new repos.
Using you new repo
Now in your other machine you can init a repo and push:
Now SSH users cannot get a login shell, only the
non-interactive shell we are going to configure will be
available.
The we must set the git shell to be used on login.
so log in your server machine, now check if the git-shell is
listed on the /etc/shells file with:
cat /etc/shells, if you do not see
git-shell there, you can add it:
sudo echo "$(which git-shell)" >> /etc/shells
But I advise you to use an editor. Now make it the login shell
for the git user:
sudo chsh git -s $(which git-shell)
Now you will not be able to get a shell on a log in. So this
user is useless for anything else than git stuff. You can only
run git commands like pull, push and clone, plus the commands
we created on git-shell-commands.
Setup up greeting and commands
The git-shell can be customized by creating the folder
git-shell-commands on the git home, the first and
funnier thing to do it to just show a message when a login
is atempted.
You can present a greeting to users connecting via SSH by
creating a file named no-interactive-login in the
folder we just created. It's funny, e.g.:
#!/bin/sh
echo "welcome to your git server!"
So when git tries to log in your server this message is shown.
Adding programs to this folder will let users run them. There
are some convenient commands to add, for example, creating a
new repository, deleting one and listing all repos. To make
them available don't forget to let them be executable:
chmod +x git-shell-commands/program
A good starting point is [2].
Conclusion
I think this is a good configuration, it is safe and let's you
fully interact with git, even creating and deleting repos.
At the same time this configuration is flexible as you can keep
adding new commands. But there is room for improvements, for
example, your repositories have zero visibility, there is no
colaboration.
Adding public access can be done using git-daemon, or setting
up the git HTTP. But those are subjects for other articles.
User authentication is a complicated subject, and we can make
things even harder if we don't want to use cookies or javascript.
authentication is a necessity for almost all web services we see,
and there are many tools and protocols to aid developers on the
subject. Using the www-authenticate header I was able to handle
user sessions without any code on the client side, just some tweaks
on my backend. The documentation for the standard is available in [1].
The http www-authenticate header is a powerful tool and part of the
basic http authentication standard, but I only became aware of it
recently, in this post I'll tell how I used it to handle user sessions
on my project tasker.
Before we start, let me give a quick overview of the solution.
Pros
No cookies
No javascript needed
Simple to implement
Has many security options to choose
Cons
Some mobile browsers have issues
Browser interface is simple and not customizable
It is somewhat limited
Implementation
Basically all we have to do is add the http header:
WWW-Authenticate on a response with status 401.
This will make browsers to show a dialog for the user to
prompt for the credentials. Doing this the browser will
automatically send the Authorization: ... header
on requests.
This can be done when the user visits a login page or tries
to access private content. In my case I added it to a login
page, the code goes like this:
func login(w http.ResponseWriter, r *http.Request) {
	user, pass, ok := r.BasicAuth()
	if !ok {
		// the user didn't send credentials
		w.Header().Set("WWW-Authenticate", "Basic")
		w.WriteHeader(http.StatusUnauthorized)
		return
	}

	// check credentials
	...

	// if ok redirect the user to its content
	http.Redirect(w, r, "/user.html", http.StatusFound)
}
I am using the Basic authorization scheme, but many others
are supported, e.g. digest using MD5, SHA256 and so on, the
RFC 7616 [2] has all info needed.
Logging in
The way I designed the login flux is the following:
User requests the /login page without authorization header
The server responds with 401 and includes the
WWW-Authenticate header
The user fills username and password and request the same path but
now the browser includes the authorization header
The server checks the credentials and if OK sends a redirect status,
e.g. 301, with the location of the new page. If not OK
the server an error page, so the user can retry after a refresh
When browsers receive this header in the response they open a
dialog for the user, some aspects can be set, for example, if
realm is set on the header it will be displayed for the
user, but be careful, this option serves a purpose, check [1] for
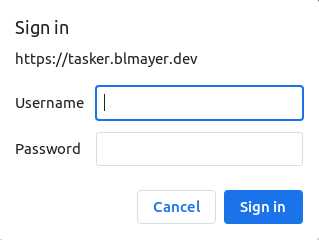
more info. The dialog looks like this on chromium:
Clicking sign in makes the browser to repeat the request but with the
Authorization: ... header on, as I set it to Basic
scheme the browser will send the credentials base64 encoded.
The nice thing about this is that the browser will keep sending the
credentials to subsequent requests of the same domain until it receives
a 401 status as response.
Server code for logged in users
Now the users can log in, every time a private page is requested we
must check the credentials, in this project i used the Basic
scheme so I check it using go's proper http functions:
user, pass, ok := r.BasicAuth()
if !ok {
	w.Header().Set("WWW-Authenticate", "Basic")
	w.WriteHeader(http.StatusUnauthorized)
	// send an error page
	return
}

// check user and pass
...

// serve your content
This way if a request comes unauthenticated for some reason the server
will ask again for credentials. another option here would be to
redirect the user to the login page.
Logging out
Logging out is done by simply returning a 401 without
www-authenticate header:
func logout(w http.ResponseWriter, r *http.Request) {
	w.WriteHeader(http.StatusUnauthorized)
	// serve a logout html page
	...
}
Final remarks
This is the method I'm using right now and I find it pretty good: it
uses only standard features that are there for years, nothing new;
there is no client side javascript or cookies, which makes it
easy to maintain and satisfy even the most demanding users.
This article was featured in the golang weekly newsletter!
I feel lucky, thanks Peter and Glenn.
A grayscale and red Xresources theme
Published: 2023-01-28
Recently I changed my terminal theme a bit, and came up with a smooth grayscale
and red pallete. The red is to look better on e-ink displays that also have one
colour, normally red. But I don't have that monitor, yet.
The theme is defined on my Xresources file, here it is:
In this post I will introduce you to plain, the best
web framework you'll ever see. It has most features you seek
on the current modern frameworks:
no boilerplate
great browser compatibility
super fast
weights nothing
creates SPAs with ease
comes with a CLI
Pretty good huh? Let's call this framework plain, because good
frameworks have catchy names.
Initializing a project
Ok so you want to use it in you project, how do you start? Simple, the
output is meant to be sent as a .html file, so we just create
a file named index.html:
<!DOCTYPE HTML>
<html>
<head>
	<title>Test</title>
</head>
<body>
	<h1>first heading</h1>
	<p>this is a paragraph.</p>
</body>
</html>
Styling your elements
Style is important, and this framework makes is super easy to add
custom styles to your elements, is uses something called CSS.
There are 2 ways to add it to your pages, first one is to add
a style tag to your head element, this is the
most commom way.
The second one is inline, so your style applies to only that
element.
<h1 style="font-family=serif">first heading</h1≶
Using javascript
Of course this incredible framework has built-in support for
javascript, because javascript is mandatory
for any decent web framework. So plain comes with, not
just one, but 3 ways of adding js to your pages, each with its
features:
Inline
This is the simplest way of running js on you page, using this
method the js script is run on the order it is encontered in
the page. You can add a script, using the script tag,
see this example:
<h1>here comes the js
<script>
	var s = document.createElement('script');
	s.type = "text/javascript";
	s.src = "link.js"; // file contains alert("hello!");
	document.body.appendChild(s);
	alert("appended");
</script>
Your scripts are already inflated and hidrated, healthy!
Internet highlights II
Published: 2022-11-02
I know it passed more than a week, so I do not plan to release
them in a weekly manner, I'll post whenever the list gets
sufficient content. This time I collected more than double
the last post. Here they are:
 And counting.